
Recently I purchased an AKAI MPK Mini MkII to use as a small sized MIDI Controller for Ableton. I’d played around with MIDI before but was still treading into uncharted waters when setting this up, during the process I lost all of the default MIDI Presets. When I realised I had done this, I thought it’d be great if I could return the device to its factory settings. After many Google searches it seemed this was going to be close to impossible as AKAI don’t provide their stock presets anywhere online for download. So I decided to fix that problem. I purchased another AKAI MPK Mini MkII, now armed with the knowledge of how it works I was able to extract the default MIDI Presets, save them out and host them here for you to use. Download links are at the bottom of this page. But first, a quick run through of how everything works.
Software
AKAI has specifically designed software to allow the user to MIDI Map their MPK Mini MkII. This software is called ‘MPK Mini Mk2 Editor’ and is available for macOS and Windows. If you wish to learn more about using this software I recommend you read AKAI’s Help Article which gives you a solid run through of how it functions.

For the purpose of this tutorial, the main thing that you need to know is the editor saves/loads files in the ‘.mk2’ file format. You can create a Custom MIDI Mapping in the editor that works for you, save it out as ‘CustomMapping.mk2’ and send it to a friend. They can load it in their editor, send it their MPK Mini MkII and use the MIDI Mapping that you have programmed. Very cool.
Each MPK Mini MkII has four different ‘Programs’, which are essentially four different MIDI Mappings that can be switched between while using the device. These are referred to as ‘Program 1’, ‘Program 2’, ‘Program 3’ and ‘Program 4’. In the software you can see these on the far left of the user interface as depicted below:
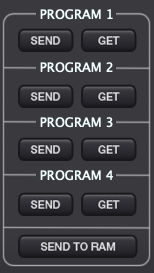
If you press the ‘GET’ Button next to ‘Program 1’ while your MPK Mini MkII is connected via USB, it will load the current MIDI Mappings for ‘Program 1’ from your device to the software.
If you press the ‘SEND’ Button next to ‘Program 1’ while your MPK Mini MkII is connected via USB, it will send the current MIDI Mappings for ‘Program 1’ from the software to your device.
In this way you can send MIDI Mappings between the software and your device as much as you would like. Please note, once you ‘SEND’ a MIDI Mapping to the device it will overwrite the exisiting MIDI Mapping on that particular ‘Program’ on the device. There is no way to get it back unless you had saved it out as a ‘.mk2’ file previously.
My Troubleshooting Steps
My new toy had arrived, I opened the box, plugged it in to my Mac and started playing around with my MPK Mini MkII in the editor software. I started messing about with all the MIDI Maps straight away as I figured out how it all worked and what exactly I was doing. I loaded different ‘Programs’ from my device, changed MIDI Mappings and sent them back to the device and tested if they worked in Ableton. I did this super quickly and without much thought, I soon realised that what I had sent back to my device had overwritten the default values. I’d mapped everything so far off the scale of normal there was no easy way to get back, I just wanted to start again, essentially an undo of all the chaos I had just caused. So I thought hey, let’s load up the defaults, it’s 2019, surely I can do that. WRONG! There is no ‘Return to Default’ Setting for MIDI Mappings in any of the menus in MPK Mini Mk2 Editor. There is no Factory Reset Option. What else could I try?
After some reading online it seemed that when you update the firmware all of the MIDI Settings are returned to their defaults. Great I thought, I’ll just update the firmware and all will be good to go again.
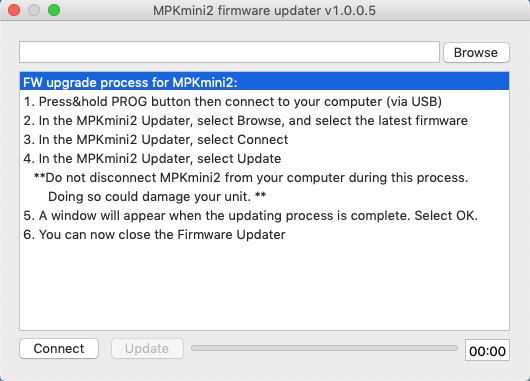
I started with AKAI’s Firmware Updater Instructions but got puzzled at Step 1. As you can see below, it says ‘Press & Hold PROG Button then connect to your computer (via USB)’. Wait, there is no ‘PROG Button’, there is a ‘PROG Select’ Button and a ‘PROG Change’ Button, what do I use? The correct answer is that you use the ‘PROG Select’ Button. I figured this out by trial and error, when holding ‘PROG Change’ and plugging in the USB Cable the device boots as normal. When holding ‘PROG Select’ and plugging in the USB Cable the device doesn’t light up as it normally would and thus is in firmware update mode.
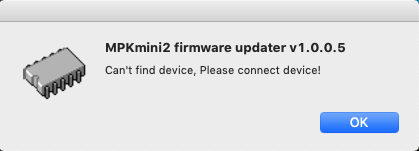
Unfortunately whenever I went to ‘Connect’ the device I got the error ‘Can’t Find Device, Please Connect Device’. But my device was connected? I tried various USB Cables, USB Ports and even a different computer just encase that was the problem, no luck. I followed various tutorials in regards to the firmware update procedure but kept having the same issue. Eventually I found a thread that said this is normal behaviour when your device is already on the current firmware. It makes sense, the current firmware is V0.022 and was released on July 16, 2014. Given that I am purchasing this 5 Years later in 2019, it’s safe to say it’d ship with the most recent firmware.
So I couldn’t do a Factory Reset, I couldn’t load Default Presets and I couldn’t do a Firmware Update. What do I do? As I had no other options, I just remapped all the MIDI Mappings to suit what I needed and forgot about the Factory Defaults. Thankfully, you don’t have to, below are the Factory Default .mk2 Files which you download and ‘SEND’ to your device.
Download the ‘Default Presets for AKAI MPK Mini MkII’
As I perviously mentioned, these are the original .mk2 Files from a brand new AKAI MPK Mini MkII. They are provided in a ZIP File, please unzip and follow the instructions below:
DOWNLOAD | MPK_Mini_MkII_DefaultPresets
- Download and Unzip the files. Once unzipped they should look like this:

- Open ‘MPK Mini Mk2 Editor’ on your Mac or PC. Please note that these instructions are tailored for use on a Mac, but the process should be similar for PC.
- Connect your MPK Mini MkII via USB. Select Options -> Device Setup in MPK Mini Mk2 Editor and select ‘MPK Mini MkII’ in both Input and Output. Once selected, press the ‘APPLY’ Button and then the ‘OK’ Button.

- Select File -> Open and navigate to the files you downloaded above. You should open ‘MPK_Mini_MkII_Program_01.mk2’ and this will open in a New Window within the editor software. You can review the MIDI Mappings in this window before sending it to your device.
- Being that this is for ‘Program 1’, just select the ‘SEND’ Button for ‘Program 1’ and these MIDI Mappings will be sent to your MPK Mini MkII.

- Repeat Steps 4 & 5 for the remaining Programs (‘Program 2’, ‘Program 3’ and ‘Program 4’).
- Done, you have successfully restored your MPK Mini MkII to it’s factory settings and thus the Default MIDI Mappings.
Conclusion
This is the blog post that I wish I had when I was diving deep into my new MIDI Keyboard. It didn’t exist but now it does, hopefully this helps some people out there who wish to return their MPK Mini MkII back to factory defaults. This could be a great option if you are selling your keyboard, as it allows you to clear your settings before passing it onto the next owner. Or if you have purchased one of these 2nd Hand, you can load it up to be as new and clear all of the old owners MIDI Mappings. Happy Music Making!
